June Harvest of the Month: Lettuce

By Ben Bachman

It’s June! That means long, hot days with lots of sunlight. In late June, there are more daylight hours than any other time of the year! At the Poughkeepsie Farm Project, June means the summer growing season is here - the perfect time to tend and harvest our Harvest of the Month - Lettuce!

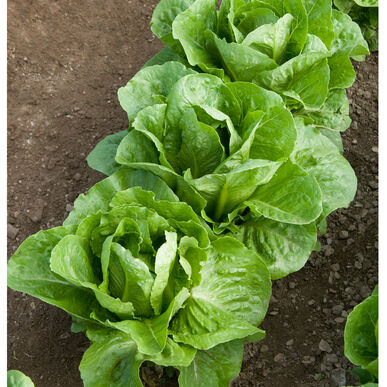
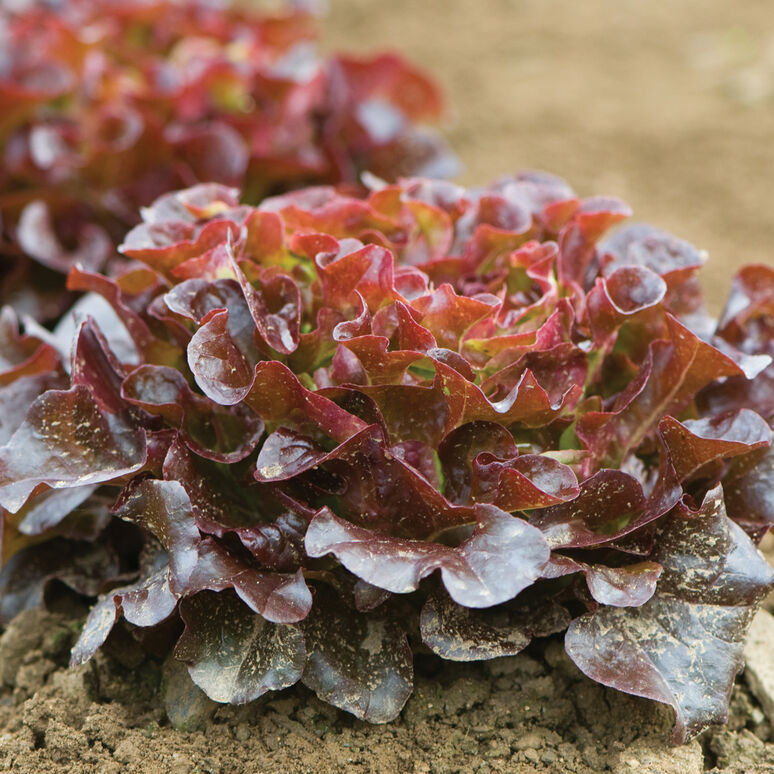
Lettuce comes in many shapes, sizes, and colors! Some of the more common types found growing at PFP are romaine and red oakleaf lettuce. Notice how different these two types look in the pictures below!

If you take a closer look at a leaf of lettuce, you’ll see a spine (or stem) and a delicate leafy portion. Both parts are good for eating. The spine of a lettuce leaf is high in fiber, while vitamins and minerals are concentrated in the leafy portion. In general, lettuce leaves with dark, rich color indicate higher fiber, flavor, and nutritional value. The most important nutrients in lettuce are vitamin A and potassium (Washington State Dept. of Agriculture).

If you’re tired of the heat and feeling cooped up at home, fresh, crispy lettuce can be a refreshing snack or a healthy addition to meals. What makes lettuce so easy and fun to eat? Just think of a salad bar! Greens taste good with all sorts of other foods, so they are great for improvising creative new combinations. You can mix them with veggies like cherry tomatoes or chopped onions and top them with fruits like apples or strawberries. You can even add protein like chopped walnuts or a hard-boiled egg. 

To finish your salad, try a dressing like the one we shared in our recent Facebook post.

Salads, of course, are just one of many ways to eat lettuce. Here are some other ideas for you to try: 

Snacktime Lettuce Roll-up

This recipe uses a few pantry staples to make a quick, delicious snack. Think of it like a wrap that uses lettuce instead of tortilla! Cut the recipe in half to make a couple roll-ups for yourself or scale it up to share even more!

Lettuce Roll-Up Recipe.png

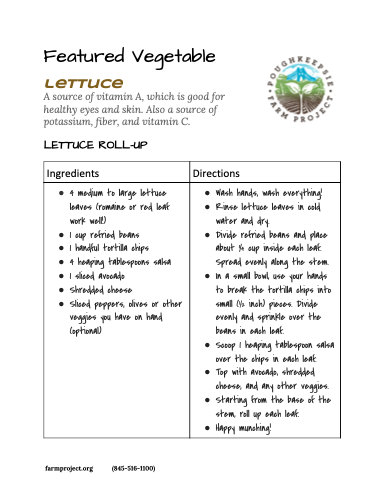
Snack Time Lettuce Roll-Ups

Easy as 1 - 2 - 3 Smoothie

This recipe calls for greens, so you can mix it up with lettuce and other leafy vegetables like spinach or kale. For fruit, mix and match different types to find what you like the most.

1-2-3 Smoothie.png

Easy as 1-2-3 Smoothie

More Lettuce Tips:

Whatever you make with lettuce, make sure to always wash the leaves with cold water and dry them off before eating!

If you need to store lettuce for later, it’s best to keep it in your refrigerator inside a plastic bag. The lettuce will be more tasty if you eat it within 2-5 days. Here’s another secret to help your lettuce last longer in the fridge: Store greens away from fruits like pears, apples, bananas, tomatoes, and melons. These fruits produce a gas called ethylene that will make lettuce spoil faster.

Grow it Yourself!

Want to grow your own lettuce at home? Lettuce is an easy choice for beginning gardeners. All it takes is a little bit of space with good soil, water, and sunlight to grow lettuce plants that can yield fresh greens all summer long. To make sure your lettuce stays healthy, harvest the biggest, most mature leaves and leave behind the smaller, younger ones. These little leaves will grow and replenish the plant until it’s ready to harvest again. You usually don’t have to wait very long, as lettuce grows quickly. Don’t wait too long to harvest, though, or your lettuce might flower and stop growing fresh new leaves!

One of the best ways to grow lettuce is in a container (like a pot or a bucket). For some helpful tips on starting a container garden, watch this video from Poughkeepsie Food Power at Home:

Lettuce can be grown from seed, like in the previous video, or you can transplant seedlings to start a Shady Salad Garden. Watch our educators do just that in this video:

Whether you decide to try a new recipe or grow lettuce yourself, hopefully you’ve learned something new about lettuce today that helps you enjoy it even more!

Coloring Sheet

For some extra fun, print out this coloring sheet to make your own colorful lettuce creation. Remember - the darker and richer the colors, the healthier the lettuce!

Lettuce-Coloring Sheet.png

Lettuce Coloring Sheet

Planting Baby Kale

PLANTING BABY KALE

Grow baby kale greens to use in a kale salad, veggie wrap, or our African style greens recipe!

Supplies

Kale seeds

Recycled microgreens tray or another small container

Potting soil

Watering bottle

Paper towel

Directions

  1. Prepare your soil: You can reuse your microgreens tray by removing the roots, or start with fresh soil!

  2. Spread your kale seeds on top of the soil. Use about 1 teaspoon of seeds.

  3. Moisten gently with watering bottle (a bottle or lid with holes poked in it)

  4. Cover with a damp paper towel.

  5. Once your seeds start sprouting, remove the paper towel because they need light to grow!  

  6. Put the tray in a well-lit area under a window or outdoors and water your kale sprouts every day

  7. In about 4-6 weeks you will have baby kale for salad!  

  8. Harvest your kale and save it in the fridge wrapped in a damp paper towel kept inside a food storage bag.

Harvest Microgreens

Harvest Microgreens
Learn how to harvest microgreens with Sonya Joy! Add flavor to your favorite recipes with microgreens!

Supplies

Tray of microgreens 
Pair of scissors
Bowl of clean water
Paper towel
Plastic bag

Directions

1. Find where the stem of the seedlings meet the top of the soil. Cut the greens at that spot with scissors. Place your harvested microgreens into a bowl of water.

2. Once you have cut the entire tray of microgreens, gently shake them in the water to remove any soil that might have come with them out of the tray.

3. Remove greens from the bowl by the handful, shaking again to remove excess water.

4. Wrap clean microgreens in a paper towel and store inside a plastic bag or food storage container. Microgreens will keep in a refrigerator this way for 1-2 weeks.


Hacer Ensalada de Col Rizada y Manzana con Lala M & Jamie

ENSALADA DE COL Y MANZANA

Ingredientes

1 manzana

3-4 tazas de hojas de col rizada bebé

¼ taza de semillas de girasol tostadas

¼ taza de arándanos secos

1 limón

Instrucciones

Lave la manzana y la col rizada. Sostén la col rizada boca abajo y tira solo de la hoja para separarla del tallo. Rasga todas las hojas de col rizada en pedazos del tamaño de un bocado con los dedos y ponlas en un tazón.

En un tazón pequeño, revuelva el jugo de limón, la miel y el aceite con un tenedor. Agregue ½ cucharadita de sal si lo desea. Vierta el aderezo sobre la col rizada y frote las hojas con el aderezo hasta que estén suaves.

Con un cuchillo de cocinero para niños, corte la manzana del núcleo. Corta la manzana en rodajas finas. ¡Decora cada tazón de ensalada de col rizada con rodajas de manzana! Receta adaptada por Chef Key

Make Kale and Apple Salad with SonyaJoy

KALE & APPLE SALAD

Ingredients

1 apple

3-4 cups of baby kale leaves or 1 bunch adult kale

¼ cup roasted sunflower seeds

¼ cup dried cranberries 1 lemon

Directions

Wash the apple and kale. If using adult kale leaves, hold upside-down and pull down on just the leaf to detach from the stem. Rip all the kale leaves up into bite sized pieces with your fingers, and put them in a bowl.

In a small bowl, stir the lemon juice, honey and oil with a fork. Add ½ teaspoon salt if you like. Pour the dressing over the kale and rub the leaves with the dressing until they are soft.

Using a kid’s chef knife, cut the apple away from the core. Slice the apple into thin slices. Decorate each bowl of kale salad with apple slices!

Recipe Adapted by Chef Key

Learn about Growing Beans with Jamie

You’ll need:

  • bean seeds

  • a bowl of water soil (on the ground or in a plant pot)

  • a trellis (if you are growing pole beans)

Instructions

  1. Decide what type of beans you want to harvest from your garden (fresh beans or dry beans).

  2. Decide whether you want to grow bush beans or pole beans. Pole beans need a trellis to climb.

  3. Wait until after the last frost in spring.

  4. Soak your bean seeds overnight.

  5. Plant about an inch deep and 2-4 inches apart in a row.

  6. Keep the soil evenly moist during germination.

  7. If you are growing fresh beans, harvest when beans are 5-6 inches long, but before they develop lumps where the seeds are. Keep harvesting and the plants will keep producing.

  8. If you are growing dry beans or if you want to save your bean seeds, leave the bean pods on the plants, let them keep growing and let the pods dry on the plant before harvesting. You will harvest fewer beans because harvesting them causes the plant to produce more bean pods.

Cinco pasos para cultivar un jardín de contenedores con Lala M & Rio

¡La jardinería en contenedores es perfecta para cultivar todo tipo de verduras, hierbas, frutales y flores sin ocupar demasiado espacio o tiempo!

Paso 1: Elija un contenedor: elija un contenedor o maceta que le guste, o reutilice o recicle un contenedor, cubo o tupperware para llevar. Se creativa, pero asegúrese de que su recipiente tenga agujeros para el drenaje.

Paso 2: Encuentre una ventana soleada para el contenedor: puede colocar la planta en los alféizares de las ventanas, mesas, porches, balcones, puertas, entradas de vehículos, ¡cualquier espacio pequeño donde pueda llegar la luz del sol servirá! La mayoría de las plantas necesitarán al menos 6 horas de luz solar al día.

Paso 3: Obtenga les otres suministres: Asegúrese de obtener una tierra para macetas de buena calidad Fertilizante: alimente una vez cada pocas semanas o una vez al mes con fertilizante líquido, como emulsión de pescado, o mezcle un fertilizante vegetal granular en el suelo antes de plantar Puede ser necesario un enrejado o estaca para plantas grandes que necesitan soporte

Paso 4: ¡Planta las plantas! Elija qué cultivar: siembre directamente las semillas o compre plántulas para trasplantar. Microverdes, lechugas verdes y hierbas son opciones que pueden caber en su ventana y crecer rápidamente. Para recipientes exteriores: tomates, tomatillos, pimientos, berenjenas, fresas, frijoles y mucho más. ¡Todos solo necesitan una maceta de 5 galones para crecer!

Paso 5: riega las plantas Es probable que sea necesario regar una o dos veces al día dependiendo de la planta. Revise la tierra al meter el dedo una pulgada hacia abajo para sentir la humedad. Las macetas o contenedores más pequeñas se secan más rápido.

Por último, ¡cosecha y disfruta de el nuevo jardín casero en contenedor !

Category

Education

0 Comments

Add a public comment...

5 Steps to Growing a Container Garden with Kathryn

Container gardening is perfect for growing all sorts of vegetables, herbs and flowers without taking up too much space or time!

Step 1: Pick a container: Choose a pot you like, or reuse or upcycle a take out container, bucket or storage container. Get creative, but make sure your container has holes for drainage.

Step 2: Find a sunny space for your container: You can put your plant on window sills, tables, porches, balconies, doorsteps, driveways--any small space where sunlight can reach will do! Most plants will need at least 6 hours of sunlight a day.

Step 3: Get your other supplies: Make sure you get a good quality potting soil Fertilizer - feed once every few weeks or once a month with liquid fertilizer such as fish emulsion, or mix a granular vegetable fertilizer into the soil before planting A trellis or stake may be necessary for large plants that need support

Step 4: Plant your plants! Pick what to grow: Direct sow seeds or buy seedlings to transplant. Microgreens, baby salad greens and herbs are options that can fit in your window and grow quickly. For outside containers: Tomatoes, tomatillos, peppers, eggplant, strawberries, bush beans and more! All just need a 5 gallon pot to grow!

Step 5: Water your plants Watering once or twice a day will likely be necessary depending on the plant. Check the soil by sticking your finger one inch down to feel for moisture. Smaller pots dry out faster.

Lastly, harvest and enjoy your new home container garden!!

Quesadilla de Risada Con Crema de Aguacate

Quesadilla de Risada Con Crema de Aguacate
para 6 personas

Ingredientes

3 tazas de queso rallado (cheddar, mozzarella o una mezcla)
12 6-inch tortillas de trigo
1 manojo de col risada u otras verduras de hojas verdes, sin tallos y picades
1 aguacate. Jugo de
1 limón verde

Direcciones

En un sartén a temperatura media cocina el col rizada y ½ taza de agua y tapa. Cocine por 4-5 minutos hasta que estén suaves. Limpia la sartén. A fuego medio, coloque la primera tortilla, espolvoree con queso cheddar y cubra con col rizada al vapor. Espolvorea con una pizca de sal si quieres. Coloca otra tortilla encima. Cocine 3-4 minutos por cada lado hasta que la tortilla esté ligeramente dorada y el queso se haya derretido. Tritura el aguacate con un tenedor.Agregue el jugo de limón verde. Ponle una pizcas de sal si le desea. ¡Cubre la quesadilla caliente con una cucharada de crema de aguacate y disfruta!

Receta adaptada por Chef Key

Kale Quesadillas with Avocado Crema

Kale Quesadillas with Avocado Crema
serves 6

Ingredients

3 cups shredded cheese (cheddar, mozzarella or a mix)
12 6-inch wheat tortillas 1 bunch kale or other dark leafy greens
2 avocado juice of 1 lime

Directions

In a skillet over medium place kale and ½ cup water and cover. Cook for 4-5 minutes until tender.
Clean the skillet. Over medium heat, place the first tortilla, sprinkle with cheddar cheese and top with some steamed kale. Sprinkle with a pinch of salt if you like. Place another tortilla on top. Cook 3-4 minutes on each side until the tortilla is lightly browned and the cheese has melted. Mash the avocado with a fork.
Add a couple pinches of salt if you like. Top hot quesadilla with a dollop of avocado crema and enjoy!

Recipe Adapted by Chef Key